Showing posts with label challenge. Show all posts

Monday, February 23, 2026

Happy St. Patty's Shaker Card

Hey guys I'm up on the Blogger with another St. Patty's card.  This time I did a shaker card for Simon Says Wednesday's Challenge. Click on the link and head over there to see all the info on the challenge, the fun prize and all the inspiration.

I used lots of Doodlebug for this one!  Actually everything is from Doodlebug except the shaker bits and the die I used.  I added some squiggly lines around the yellow die cut wonky frame with a jelly roll white pen.

Pro tip- if you do not have acetate to make your shaker, packaging from your crafty goodies works just as well!

Thanks for stopping by and I hope I inspired you to put a smile on someone's face by making them a card!

Stay crafty

Kimberly 

Thursday, February 12, 2026

Masculine Anniversary Card

Hi guys I'm up on the Blogger making a masculine Anniversary card.  I'm not gonna lie, I do like how this turned out.

This is for the following challenges: PIP Challenge 2606, and Creative Fingers Challenge #315, make sure you head over there and check out their fun challenges and all the inspiration!

I used a 6x6 paper pad from THE PAPER STUDIO called SUN BLEACHED FLORAL and I am in love with ALL the papers!  It's rare that I love all the papers in a paper bad but this one I do!

I picked a tiny floral pattern from the pad and then pulled out some 49 and Market rub ons.  The theme of the rub-ons was world/travel so I thought it was perfect for my sentiment YOU MEAN THE WORD TO ME.  Since I didn't have a stamp that said that I ran the A2 card panel through my printer.  I also wanted the words Happy Anniversary on it and since some how I don't have a stamp that says that I ran it through my printer again.

I die cut some stitched hearts I got from THE SCRAPPING COTTAGE and inked them with some lost shadow and adhered them to the front.  I wanted to match the blues from the rub ons so I reached into my stash and found a card stock that went perfectly with it.  I used a marker to put the lines under the sentiment HAPPY ANNIVERSARY and I was done.

I am in love with rub ons right now.  Do you use rub ons on your cards?

Well thanks for hanging out with me today, and if you would like to join in on any of these challenges be sure to click the links!

Have a crafty day!

Kimberly


Tuesday, January 20, 2026

Inky Paws Challenge #248

 Hey guys I'm up on the Blogger doing the Inky Paws Challenge #248.  I just love these colors and they are perfect for Valentines day!  Here is the link to the Challenge and all the rules, I hope you join in on the fun.

Since you have to use an Inky Paws product I went to their website and downloaded a FREEBIE (how super sweet for them to do that).  They had a few so after looking at them I decided to go with this sweet bird "YOU'RE TWEET!". 

After downloading it I colored it in (and tried my best to do some shading but guys I am STILL learning).  I used SPECTRUM NOIR tri-blends in PV1/PV3/PV4 and PP1/PP4/PP6 and then I grabbed a Copic Marker RV42.  

After I finished up with the image I used a cloud stencil with some Saltwater Taffy and Lilac (CTMH) and die cute a big heart these Newton's Nook heart dies are perfect!  I also pulled a stamp that had some cursive writing on it and stamped using the LILAC from CTMH on 2 different scraps that matched the colors of the Challenge.

I pulled out a piece of 6x6 paper with ALL the colors from the challenge on it (Brass & Bliss) and cut and 1/8 smaller than a A2 card.  I then reached into my stash and pulled another color from the challenge  to back it at an A2 size.  

I glued everything down, popping up one of the smaller hearts, and called it done!

I'm not mad at it.  Don't forget to head over to the Challenge and see all the amazing inspiration for this challenge.

Thanks for hanging out with me today...have a crafty day!

Kimberly

Monday, November 10, 2025

COLOR DARE WEEKLY CHALLENGE #677

Hey guys I'm here playing along with the Color My Heart Color Dare Weekly challenge, #677.  I just found them and can't wait to play along with some of their challenges.  Here is a link to find them and check out all their awesome card making challenges you might want to join in. 


I made this quick Fall card using scraps and older stash. I used the orange (various shades) with the green and my +1 color is brown along with the free to adds (black, white, neutrals).   I love the season and the colors of Fall what about you?


Thanks for stopping by and I hope you head over and check out their fun challenges.

Have a crafty day!

Kimberly 


Sunday, October 19, 2025

Double Trouble Challenge #202

Hey guys, I'm up on Blogger sharing my Autumn Blessings card I made for October's Double Trouble Challenge #202.  Here is a link to their blog and challenge if you want to join in or just get some fun inspiration.  I also entered this into the Pearly Sparkles Challenge #112.  Here is a link to their special challenge as well.  So many challenges that I love, get's those creative juices flowing!

Here is what Thing 1 has challenged us to this week:


I also took Thing 3  up on her twist this month - 
She says, "Fall colors are beautiful, but the pumpkins are my favorite. Hey, what happens when you drop a pumpkin? It goes Squash. Trouble Maker will tell me to stop bean corny.  So let's keep calm and carrot on and don't turnip your nose at me... I yam who I yam. My optional twist is to include any autumn fruit or veggie in your project."  So of course  I chose Pumpkins!  

I started off with an A2 110# card base and inked it with some Distressed oxides in MUSTARD SEED, CARVED PUMPKIN, GROUND ESPRESSO, FOREST MOSS and BUNDLED SAGE.  

After I inked the card base I took a die set of Fall leaves and sticks I had and made a stencil (if you ever want to do a stenciled background and don't have a stencil pull out those dies, cut them with a thicker card stock and BAM! instant stencil).  I used those same Distressed Oxides I inked the background to ink the leaves.  I then added some acrylic paint in brown and some Craft Twinkles (from DecoArt) in gold and mixed them ...this stuff is gold (no pun intended) but seriously it's the first time I'm using it and I loved it.

I then got out my pumpkin dies I purchased from Amazon, die cut them using 110# card stock in white and inked those up along with some of those Fall leaves that I cut to make the stencil...that is a set from the Signature Collection by Sara Davies called AUTUMN MORNING.

I set those aside and pulled out my new La La Land Crafts (their stuff is awesome) clear stamps called CHINCHILLIN', stamped that cute chinchilla and used my Copic Markers on him (E11, E13, E21, E23, E27, and E30).  

I adhered all of it together on the card base and then grabbed the sentiment from the Signature Collection by Sara Davies and stamped AUTUMN BLESSINGS.

Well that wraps it up for this challenge.  Thanks for hanging out with me today.  Don't forget to head over to the Double Trouble Paper Crafting blog and check out all the fun!

have a crafty day!
Kimberly 


Saturday, June 7, 2025

Coffee Loving Papercrafters Caffeinated Christmas Card Challenge #42

 Hey guys, I'm up on the blog doing Challenge #42 for the Caffeinated Christmas Card Challenge.  If you want to join in here is the link!

I started out with 110lb white paper (oh how I will miss those awesome SALES at Joann's), stamped this cute Sloth stamp, from Brass and Bliss,  (ALL YOU NEED IS COFFEE) I would link it but it was so cute it sold out...and used my Spectrum Noir alcohol markers to color it and then die cut it out. 

I then took the same 110# white paper and inked it in some Vicki Boutin (color wheel, red) and some Tim Holtz Distressed Oxide (in Pine Needles).  I then stamped this awesome coffee to go cup stamp from AlteNew called Friends Forever, one of my fav coffee stamps!  I made sure to stamp it so that the colors were where I wanted them.  I used my Spectrum Noir to color in the lid.


I grabbed my new Whimsy BURST stamp (I LOVE THIS STAMP) to stamp on another 110# white paper (no wonder I go through so much white paper)!  I used the same 2 colors, the red from the color wheel, and the Pine Needles from Tim Holtz, to stamp on the different sides of that burst stamp to give it some added dimension and color and I do love how it turned out.

I reached into my stash and pulled out the sticker that says HAPPY HOLIDAYS and the 2 Christmas foliage stickers to put on either side of the cup.  I also found that cute Christmas hat to add to the Sloth.  I adhered the "Burst" panel on some Christmas red metallic card stock, added the coffee cup and then popped up that Sloth on some foam adhesive and called it done.  Super easy card and I was able to use up some older stash!

I am not mad at it!  Thanks so much for stopping by and hanging out and don't forget to hop over to the Challenge and join in!

Have a crafty day!
Kimberly


Saturday, January 11, 2025

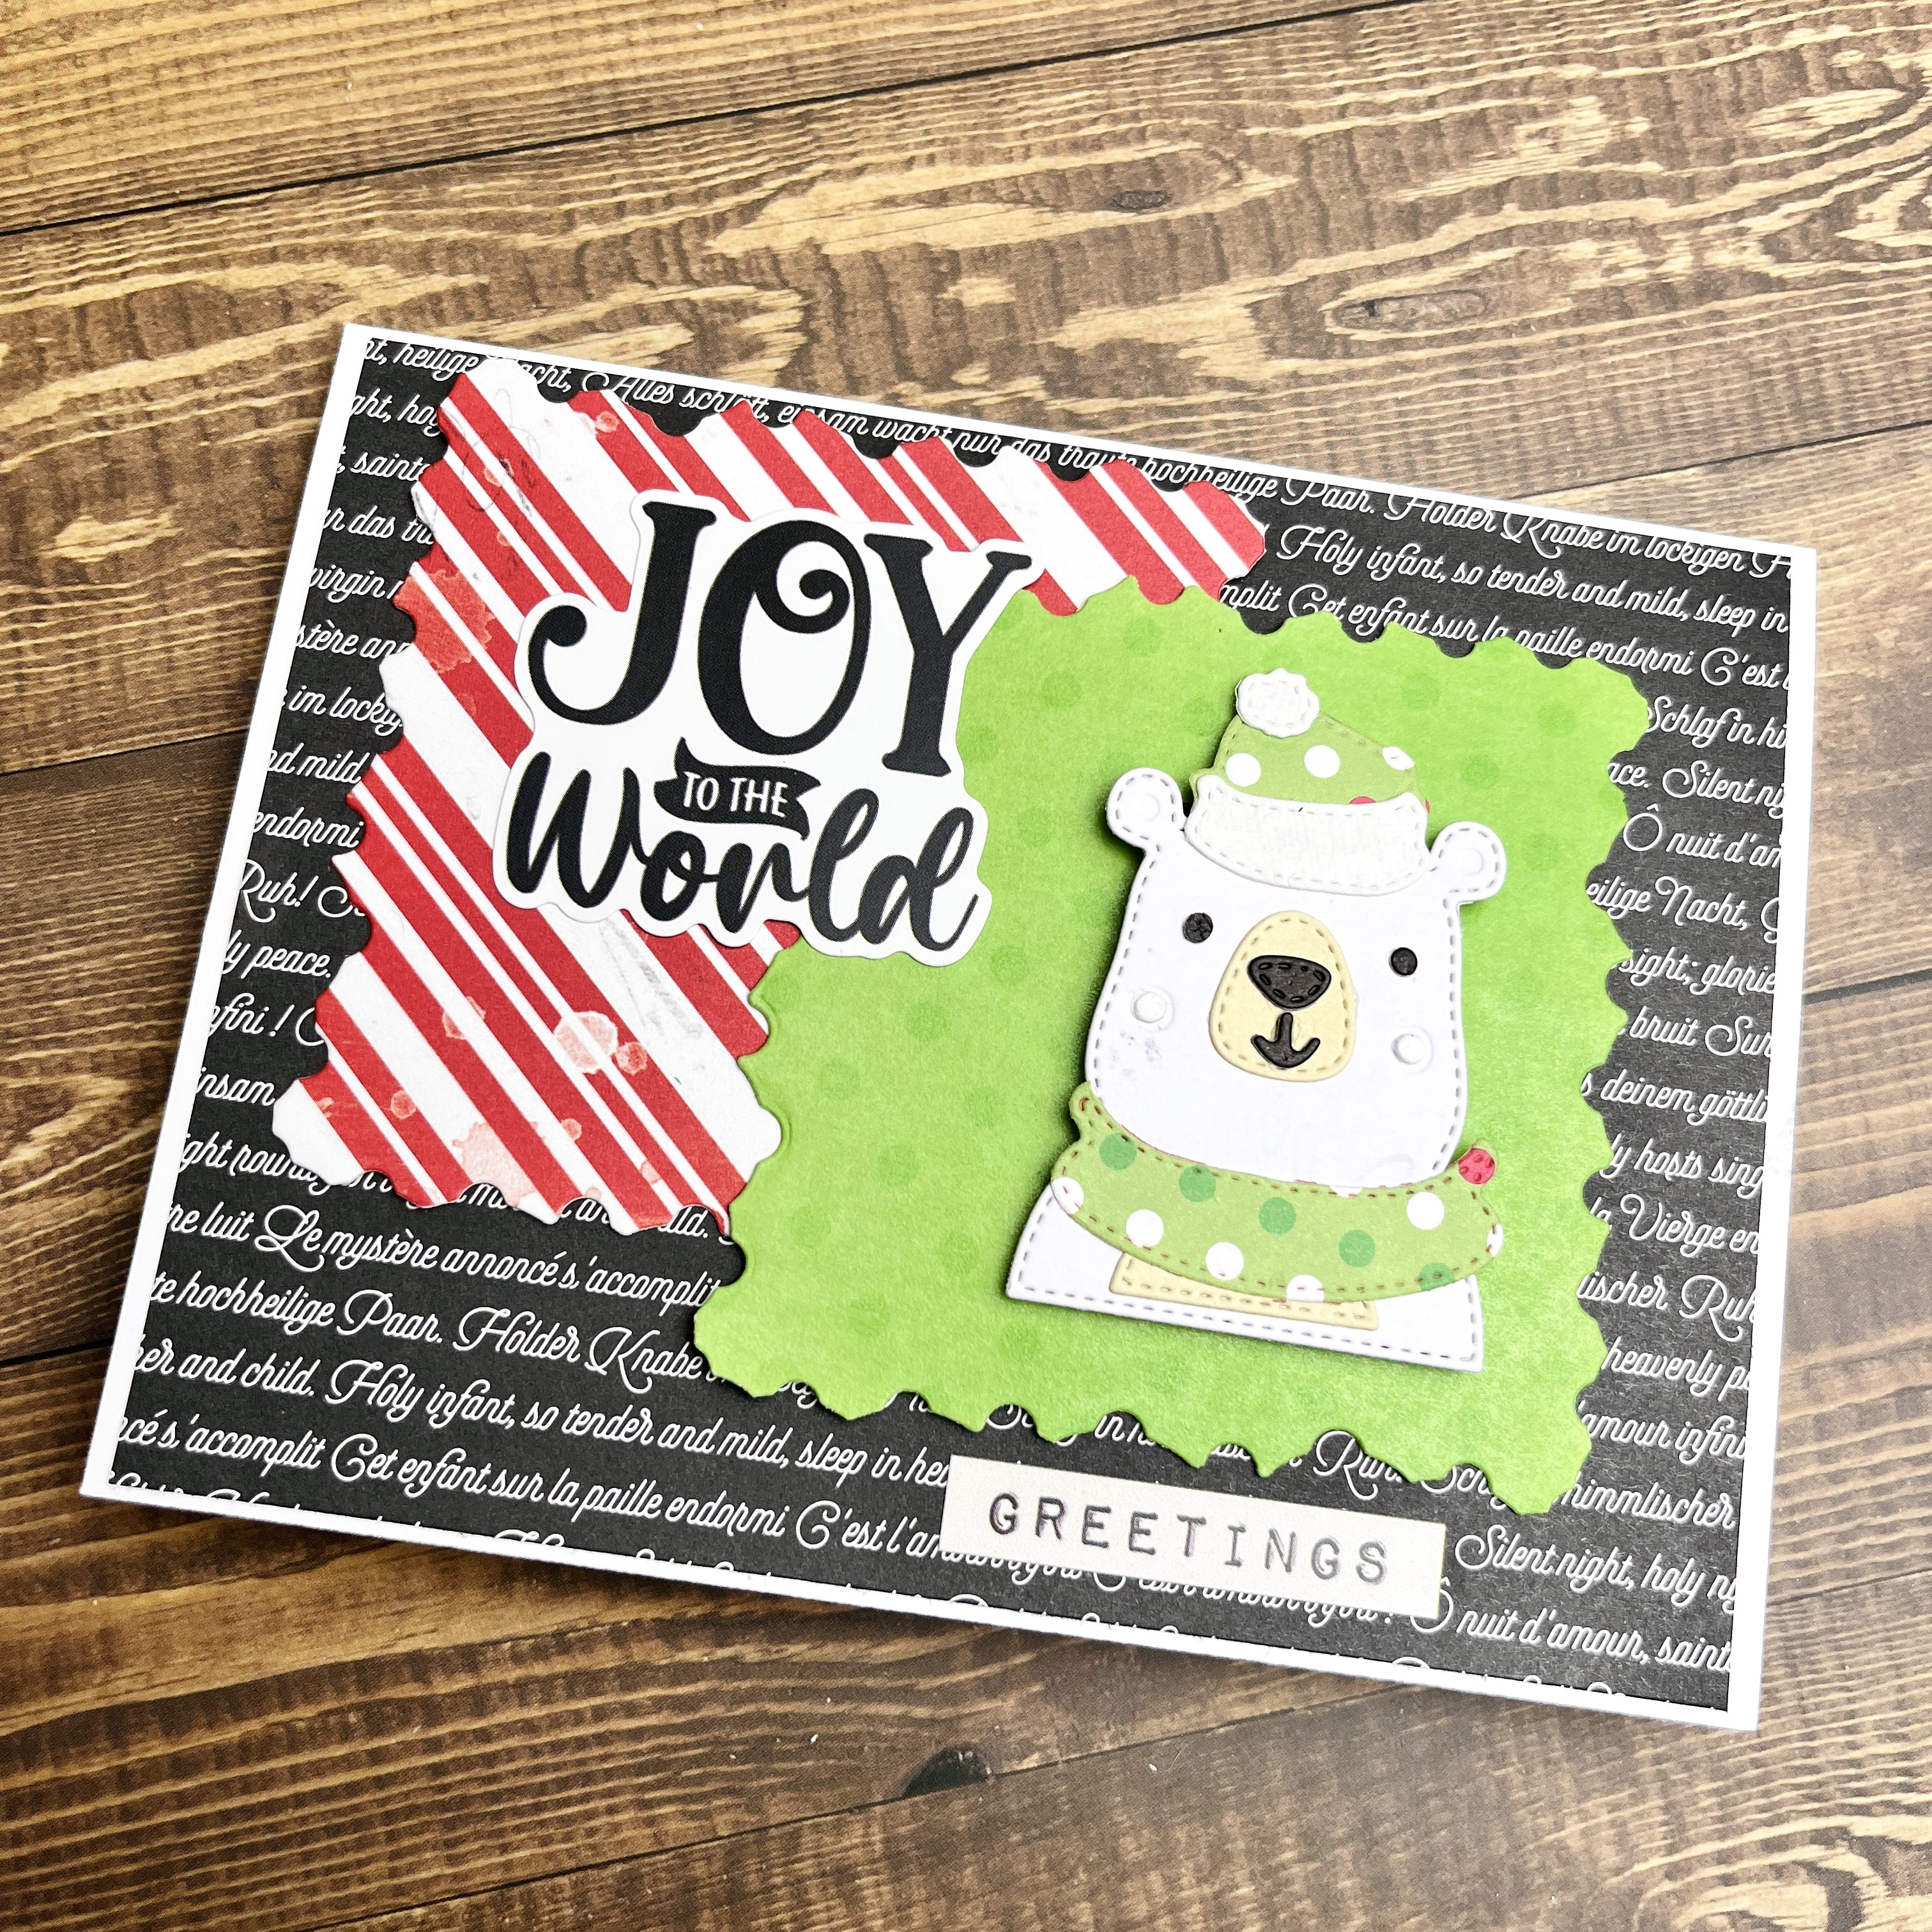
Card - Joy To The World (Winter Bear)

Hi guys, I'm back up on my blog to share another card I made for the 3-2-1 Challenge over on the Double Trouble Paper Crafting Blog Post.  The challenge from Thing 1 is to do 3 colors (I chose a black & white pattern paper, a red & white pattern paper and a bright green pattern paper as my 3),  at least 2 layers and at least 1 warm and cuddly image...I'm pretty sure this bear is both warm and cuddly😆

I started with a White A2 card base and added a slightly smaller Christmas music pattern paper on top and then reached for my CREATIVE EXPRESSIONS CHRISTMAS CHARACTER die set and die cut and pieced together this Winter Bear.  I love this die set...it comes with 3 different characters (Fox, Deer and this Bear) and you can use any pattern papers to make them fun and for different seasons or just cut all the pieces out in White and use your markers.  It also comes with some awesome wonky frames that I am in love with, they are so versatile!

After I pieced the bear together I cut 2 different sizes of those wonky frames out of some Christmas pattern paper I had in my stash and adhered them down.  I popped the bear up on some foam tape and added a sentiment from my stash to finish it off.  I love this card for the mere fact that I used ALL OLD STASH! I so love when that happens.

If you want to play along or see what other fun stuff the Double Trouble gals are up to click here.

Thanks so much for stopping by,

Kimberly

Friday, January 10, 2025

You're the Best Card

 Hey guys,

I'm up on the blog with another challenge, this time it's for the Double Trouble Paper Crafting gals. This is a fun group, if you haven't heard of them head over and check them out HERE...they are always coming up with such fun challenges from Thing 1, Thing 2 and Thing 3!  I mean who isn't a Dr. Seuss fan?!?!   

I'm also playing along with Critter Crazy Challenge Blog, Challenge #94 ANYTHING GOES, click HERE for more info on that blog challenge!

This is for Challenge #182 3-2-1 Recipe "Warm & Cuddly, click here for more info.   For my card I chose the 3 colors of Blues, Oranges and Pinks; 2 layers (I actually did 3 not counting my card base) and 1 warm or cuddly image.

I started out with a pattern paper with different shades of Orange and a little bit of pattern in it.  I have had this paper in my stash for a while and then it ended up in my scraps and now I've used it up...Yay me!! I cut it to an A2 card base and then grabbed my nesting dies with this cool postage stamp edge in 2 different shapes (square and rectangle) that I got from Cottage Cutz.  I cut 3 panels (2 square and 1 rectangle) and blended them with some Tim Holtz distressed oxides in Salty Ocean.  I tried to use the masking technique prior to blending and for this being my first time, I'm not mad at it.

I added a little bit of foam adhesive to the one panel and to the smallest sentiment panel and adhered it down.  I then stamped my image from a  PENNY BLACK stamp called HEARTS APLENTY...how cute is that image.  I colored it using my Spectrum Noir markers (I am still trying to learn how to shade so no judging).

The 2 sentiments came from my stash of stamps that I've had forever.  I added some bling and done!  I would say this came together rather quickly but I would be lying...it took me 3 times to color that image before I liked it.

Thanks for hanging out with me and don't forget to head over to the DOUBLE TROUBLE PAPER CRAFTING BLOG site to find some really fun challenges with some cool twists!

Stay crafty my friends!

Kimberly

Wednesday, December 18, 2024

Caffeinated Christmas Card Challenge #36

Hi guys, I'm up on the blog hopping on the Caffeinated Christmas Card Challenge #36.    The THEME is Snowman, and who doesn't love a good snowman in the middle of winter!  This is the first time I'm making a 5x7 card!  

I pulled out my STAMPENDOUS! Snowman Hugs die and the coordinating stamp set.  This Die set is sooooo cute and comes with 2 different size snowmen and some cute Christmas icons too.  I got this stamp set a few months ago and haven't even played with it yet so when I saw this challenge I had to play along.


I started off die cutting all the pieces and trying to find some Christmas paper to coordinate the hat and scarf and since I have a HUGE stash of Christmas paper that wasn't a problem.  After putting the 2 snowmen (or should I say snow adult and snow child) together with their cute hat and scarfs, I reached into my stash and got my Gemini stamp set that had the cute HOT CHOCOLATE sentiment and stamped the card.

I grabbed my Momenta die set of snowflakes and die cut 3 out, glued them on and added some red half pearls to bring some more red into the card.  I added the snowman, popping the small one up on foam tape.

The coffee cup stamp is an old stamp set I've had for years, I stamped it, added a snowflake stamp in red and then used my Copic Markers to color in the cup.

Here is the finished 5x7 card!  I do like how it turned out and so happy I bought this die set, it is so versatile with the add on dies and stamps it has.

Thanks for hanging out with me and here's the link so you can head over and join the fun!

Kimberly


Sunday, June 16, 2019

A-4 Coffee Card

Hey guys!

This was a challenge I'm doing for the Coffee Loving Papercrafters on their FB page.  To join their group click here...always fun challenges and prizes too!

The challenge was to make a card following these rules this week:

 REMEMBER THIS IS CLEAN AND SIMPLE WEEK - THESE ARE THE RULES WE POST EVERY CAS CHALLENGE

What do we mean by Clean and Simple?
  • Minimal layers and embellishments
  • Plenty of open space, aka "white" space
  • Simple and uncluttered


I just wanted to jump on and show you how simple this card was to make.  
  1. measured 8 1/2 my 11 and cut it to  5 1/2 to make the A-4 card using white card stock.
  2. I measured the card at 4 1/4 and creased it to make the fold
  3. I used a strip of left over scraps to make the border on the bottom.  
  4. I used my sticker sheet from Echo Park Coffee Collection for the "Messy Bunn & Coffee Run"girl.
  5. Added another sticker from the same collection to the bottom border.
  6. Used my tiny heart stamp to stamp 2 hearts on the bottom border and one in the upper right corner of the "Messy Bun..." sticker.
  7. I used my Stamp from the stamp collection from Ink Road Stamps to stamp "today's good mood SPONSORED BY COFFEE" in brown ink.
  8. I added brown acrylic paint splatters on the white space just to give it a little something extra without covering all of the white space.
Well There you have it!  I hope you are able to follow along with this blog hop.  Please leave a comment to let me know what you think.  This was super easy to make!


Until Next time!  Coffee on...
Kimberly